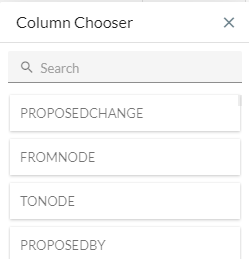
How to use Column Chooser
The column chooser icon, highlighted below, opens a pop-up menu within the Details grid, enabling you to adjust the visible columns. This tool facilitates easy data visualization and allows for the creation of new fields on the Details Grid.

Steps to add Columns to the Grid
- Select the Column Chooser.
- Search and locate the desired column.
- Drag and drop the column to the desired position in the grid.
Steps to Remove Columns from the Grid
- Select the Column Chooser.
- Click on the header of the column you wish to remove.
- Drag and drop it onto the column chooser popup to remove it.

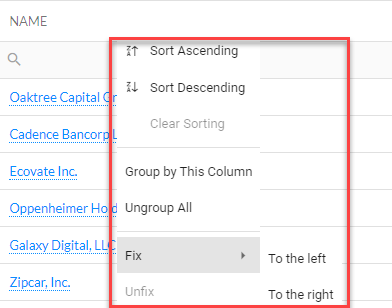
Steps to Fix a Column
If you have multiple columns and wish to keep certain ones visible while scrolling:
- Right-click on the header of the column you want to fix.
- Click Fix and choose whether to fix the column on the left or right side of the grid.
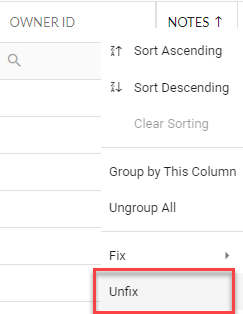
Steps to Unfix a Column
To revert a fixed column to its normal state:
- Right-click on the header of the fixed column.
- Select Unfix to return the column to its standard position in the grid.
Additional System Fields That Can Be Added:
Aside from fields imported from data sources, fullcast.io provides default system fields that can be added through the Column Chooser:
- Proposed Changes Fields - Includes Proposed Change, From, To, Date/Time, and Proposed By.
- Industry Taxonomy Fields - If enabled in the Design Module and NAICS/SIC codes are available, you can add Sector, Super Sector, and Industry fields based on your Industry Taxonomy.
- Levels and Current Node - Shows up to 15 levels in the territory hierarchy and the current node.
- Last Updated Date and Last Updated By - Indicates when the record was last updated in fullcast.io, either through import processes or user edits.
- Notes - Contains notes added by users.